Thai Pumpkin Pudding
It’s that time of year again. It’s time to add a different pumpkin dish to my menu. If you know me, you know I love everything pumpkin. Last year, I was inspired by my team’s Thanksgiving lunch and came up with pumpkin bars. This year, I’m digging closer to my roots and bringing those Southeast Asian flavors to the table.
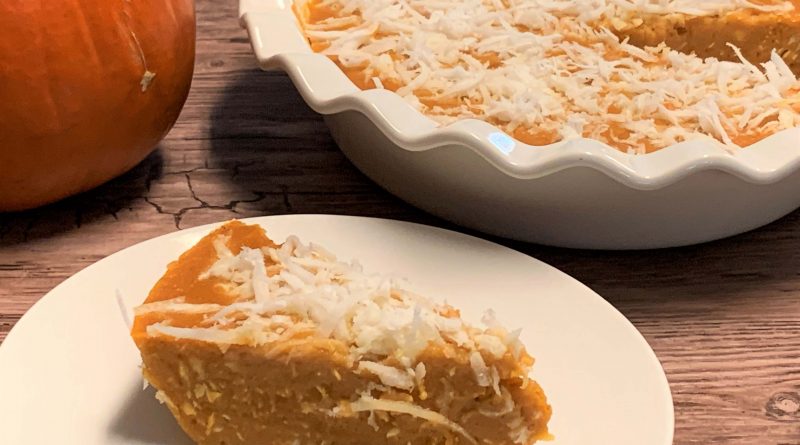
This is a recipe for kanom phakthong (ขนม ฟักทอง) or kanom mak-ue (ເຂົ້າຫນົມ ຫມາກອຶ), pumpkin pudding. This dessert is more common in Thailand. Traditionally, it is made with a textural bite from more tapioca starch or arrowroot flour. In my opinion, it’s too tight of a pudding to be called a pudding. So, I’ve taken the liberty of making this pudding my way. My recipe is for a creamier and a more custardy pudding. It’s more like a crustless pumpkin pie. Both the pumpkin and the coconut shines. I’ve already gotten mom’s approval.
This is such an easy recipe. Literally, mix and steam. See my notes below on baking it if you don’t have a steamer large enough. However, if you don’t have a steamer large enough for a pie pan, you can always use ramekins for smaller desserts.
Did I mention that it’s vegan and gluten free? Yes, rice flour and glutinous rice flours are gluten free. For a while, I was under the impression that glutinous rice and glutinous rice flour had gluten. However, I’ve learnt that it is named for its sticky texture and not for its gluten content. Glutinous rice and other rice are naturally gluten free. But I have completely digressed because we’re not even using glutinous rice flour in this recipe. We’re using rice flour (red bag). Where was I? The tapioca starch (blue bag) is also gluten free. Even if you substituted the tapioca starch with corn starch, that’s still gluten free and the dessert would still be vegan!

Notes:
To steam or to bake? – Baking has many more nuances. The steaming method is the traditional method, and it seems to cook a lot quicker via the steaming method than the baking method. If baking, you’ll want to bake with the pie pan in a roasting pan filled halfway with hot water. This will help give it that steaming action, prevent the pudding from cracking and keep the custardy texture. I found that the baked pudding had a darker color and some of the coconut on top got toasted as well, which was quite nice if you like toasted coconuts and I do. It brings out more of a caramel note from the brown sugar too. However, you’ll have to deal with potential cracking. Treat it like a cheesecake and let it slowly cool. Don’t take it out of the oven and straight into the fridge. That sudden temperature change will cause it to crack. Overall, the shorter amount of time and ease of the steaming method makes it the better method.

Coconut – I used the frozen scraped coconut that I thawed in the fridge. You can use unsweetened coconut flakes that you can find the baking aisle. If you end up with sweetened coconut flakes, you’ll have to adjust the sugar.
Sugar – Speaking of sugar. You can use white sugar, palm sugar or light brown sugar and adjust this to taste. I started out with ¾ cup of brown sugar, but mom and I agreed that it was just a little too sweet for our tastes. So, reducing it to 2/3 cup made it better for us. Depending on the day, I might even reduce the amount of sugar down to ½ cup or so. Not too sweet.
Thai Pumpkin Pudding (Kanom Phakthong)
Time: 45 minutes – 1 hour
Serves: 8-10
1 (15 oz/ 425g) can pumpkin puree or 1 2/3 cup cooked and pureed fresh pumpkin
½ cup (71g) rice flour
2 tablespoons (14g) tapioca starch (or 1 tablespoon corn starch)
2/3 cup (143g) brown sugar or palm sugar (can be adjusted to taste)
¾ teaspoon salt
1 (13.5 oz/ 400 ml) coconut milk
1 cup (120g) scraped coconut or unsweetened flake coconut (divided)
• Fill steamer pot with water, cover and bring to a boil.
• In a large bowl, whisk together pumpkin puree, rice flour, tapioca starch, brown sugar, and salt. Slowly mix in coconut milk and whisk until smooth.
• Fold approximately ½ cup of scraped coconut into the batter. Place a 9-inch round baking pan (I used a pie pan) into the tray of a steamer tray. Pour the batter into the pie pan. Place tray over steamer, cover and let steam for 35-40 minutes. The center will be wet from the steam, but it will be set and now longer liquidity.
• ***Alternatively, the pudding can be baked in the pie pan, in a hot water bath for 55-60 minutes or until the center is longer wet and firm to the touch. ***
• Carefully remove the pan from the steamer tray and let it cool completely. At least two hours. It will set up a little more.
• Cut and serve.
• The pudding can be made a day or two ahead and stored in the refrigerator. It’s better the next day, after it has fully set but tastes best if eaten within 3-4 days.
Discover more from Crafts to Crumbs
Subscribe to get the latest posts sent to your email.


